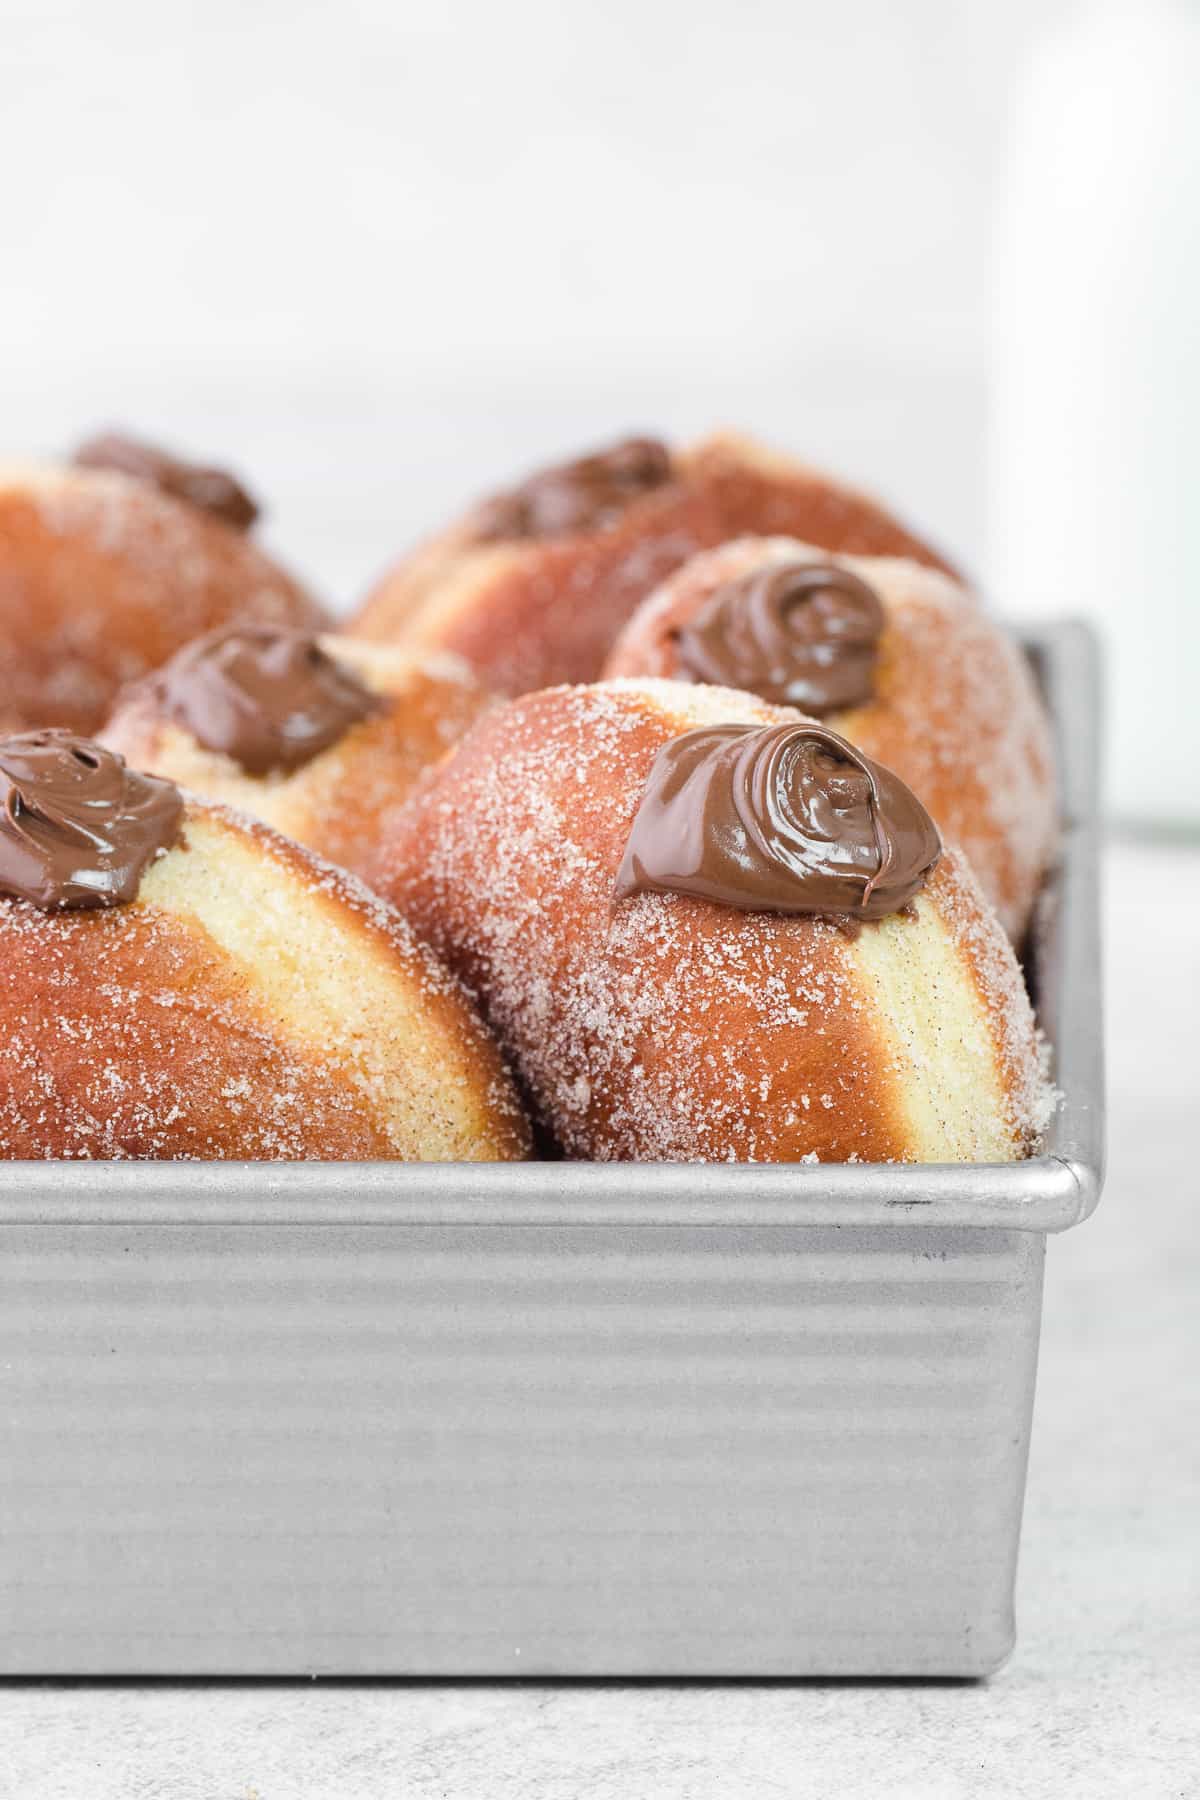
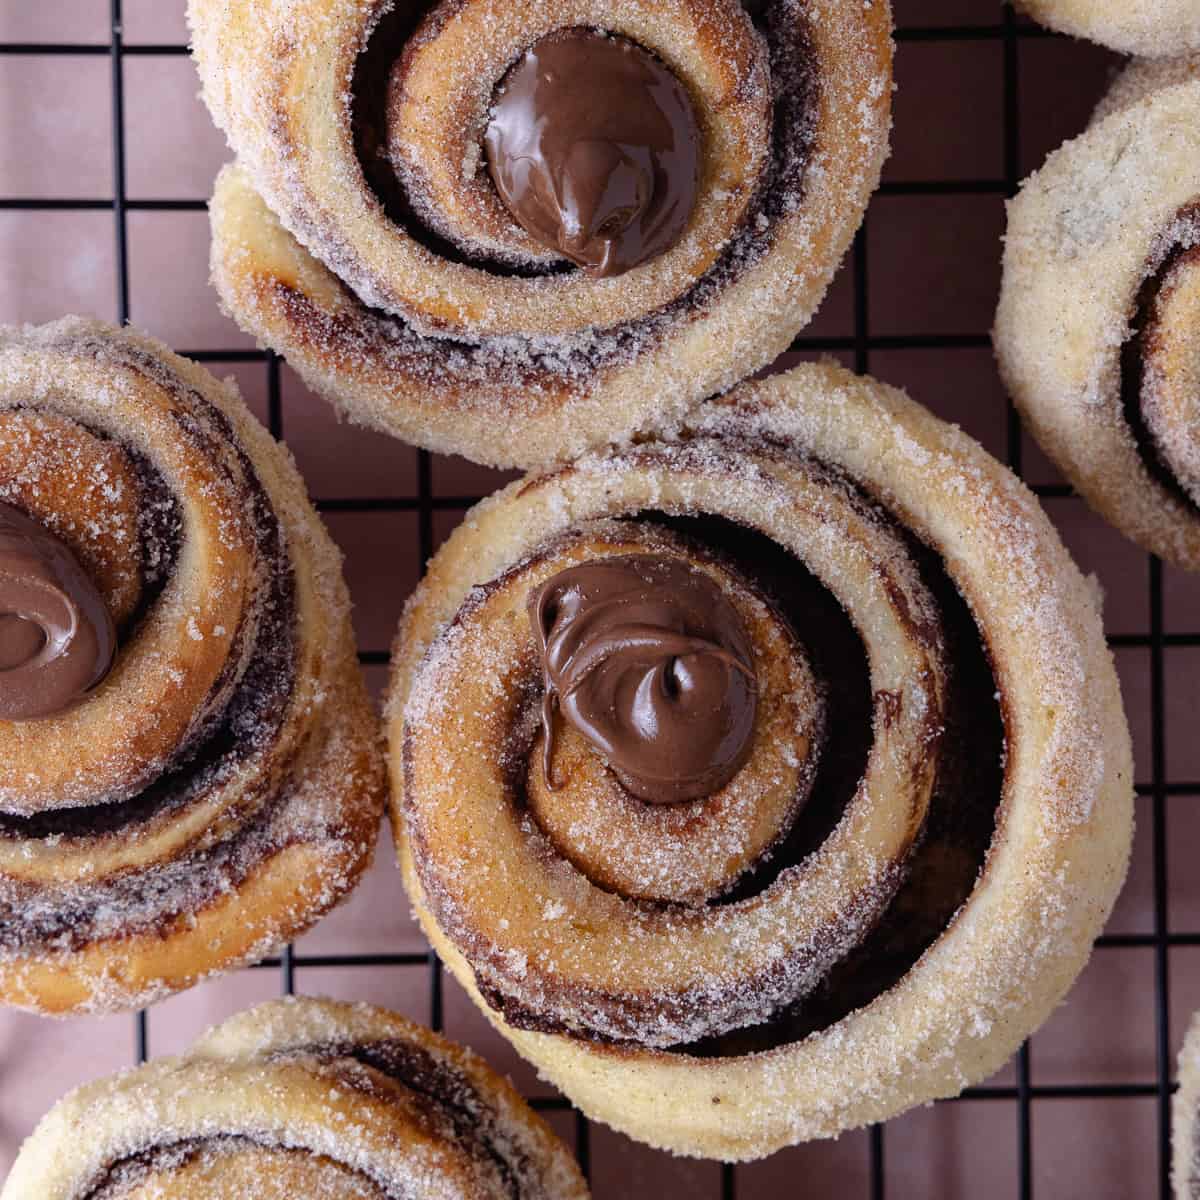
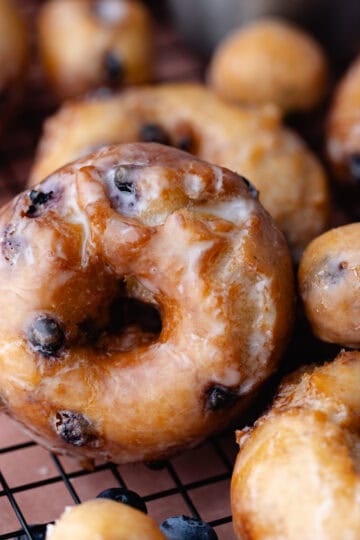
Amazing Nutella Filled Donuts - These light and fluffy homemade donuts are deep fried to perfection, coated in cinnamon sugar and filled with creamy Nutella!
Donuts are definitely my weakness! Cake donuts, brioche donuts, old fashioned donuts, any donuts! I LOVE them all! I learned how to make donuts many years ago and I'm sharing one of my favorite recipe with you.

♡ Why You Will Love These Nutella Filled Donuts
- Light as a feather. The buttermilk makes these Nutella filled donuts SO light an fluffy.
- SO easy to make. This yeast enriched dough is so much easier to make than a traditional brioche dough. The butter is melted and added at the beginning of the kneading process. If you have a stand mixer, it makes it even easier!
- Nutella + Cinnamon Sugar. A match made in flavor heaven!
- Versatile. Once you master this simple enriched dough, you can create an endless variety of fillings, glazes and coatings. You can even make fun shapes like my Heart Shaped Bricoche Donuts, Rose Shaped Brioche Donuts or Croissant Shaped Brioche Donuts!
Ingredient Notes
Here are some notes about all the ingredients used. Quantities and full instructions are in the recipe card below!

- Bread Flour & All-Purpose Flour. I like using a combination. Bread flour has a higher amount of protein, which will add structure to your donuts. If you're unable to find bread flour, you can use all-purpose.
- Malted Milk Powder. This is optional, but highly recommended. It makes the donuts soft and enhances the flavor. I use this one.
- Salt. Rounds out the flavors.
- Buttermilk. Adds a bit of tanginess and makes the donuts tender. Warm buttermilk will be used to activate the yeast.
- Yeast. I am using dry active yeast for this recipe. I'll include instant yeast notes below in the recipe card.
- White Sugar. A little bit of sugar will be used to feed the yeast when we activate it and ¼ cup will be added to the dough.
- Unsalted Butter. We'll be using melted butter.
- Eggs + Yolk. Adds richness and structure. We want the eggs to be at room temperature here. To quickly bring your eggs to temp, submerge them into a bowl of hot tap water for about 15 minutes.
- Vanilla. Adds flavor. You can use vanilla paste or vanilla extract.
*See recipe card for quantities.
Step-By-Step Instructions
Here are step-by-step photos and instructions on how to make these Nutella Filled Donuts! Please find detailed instructions in the recipe card at the end of this post.
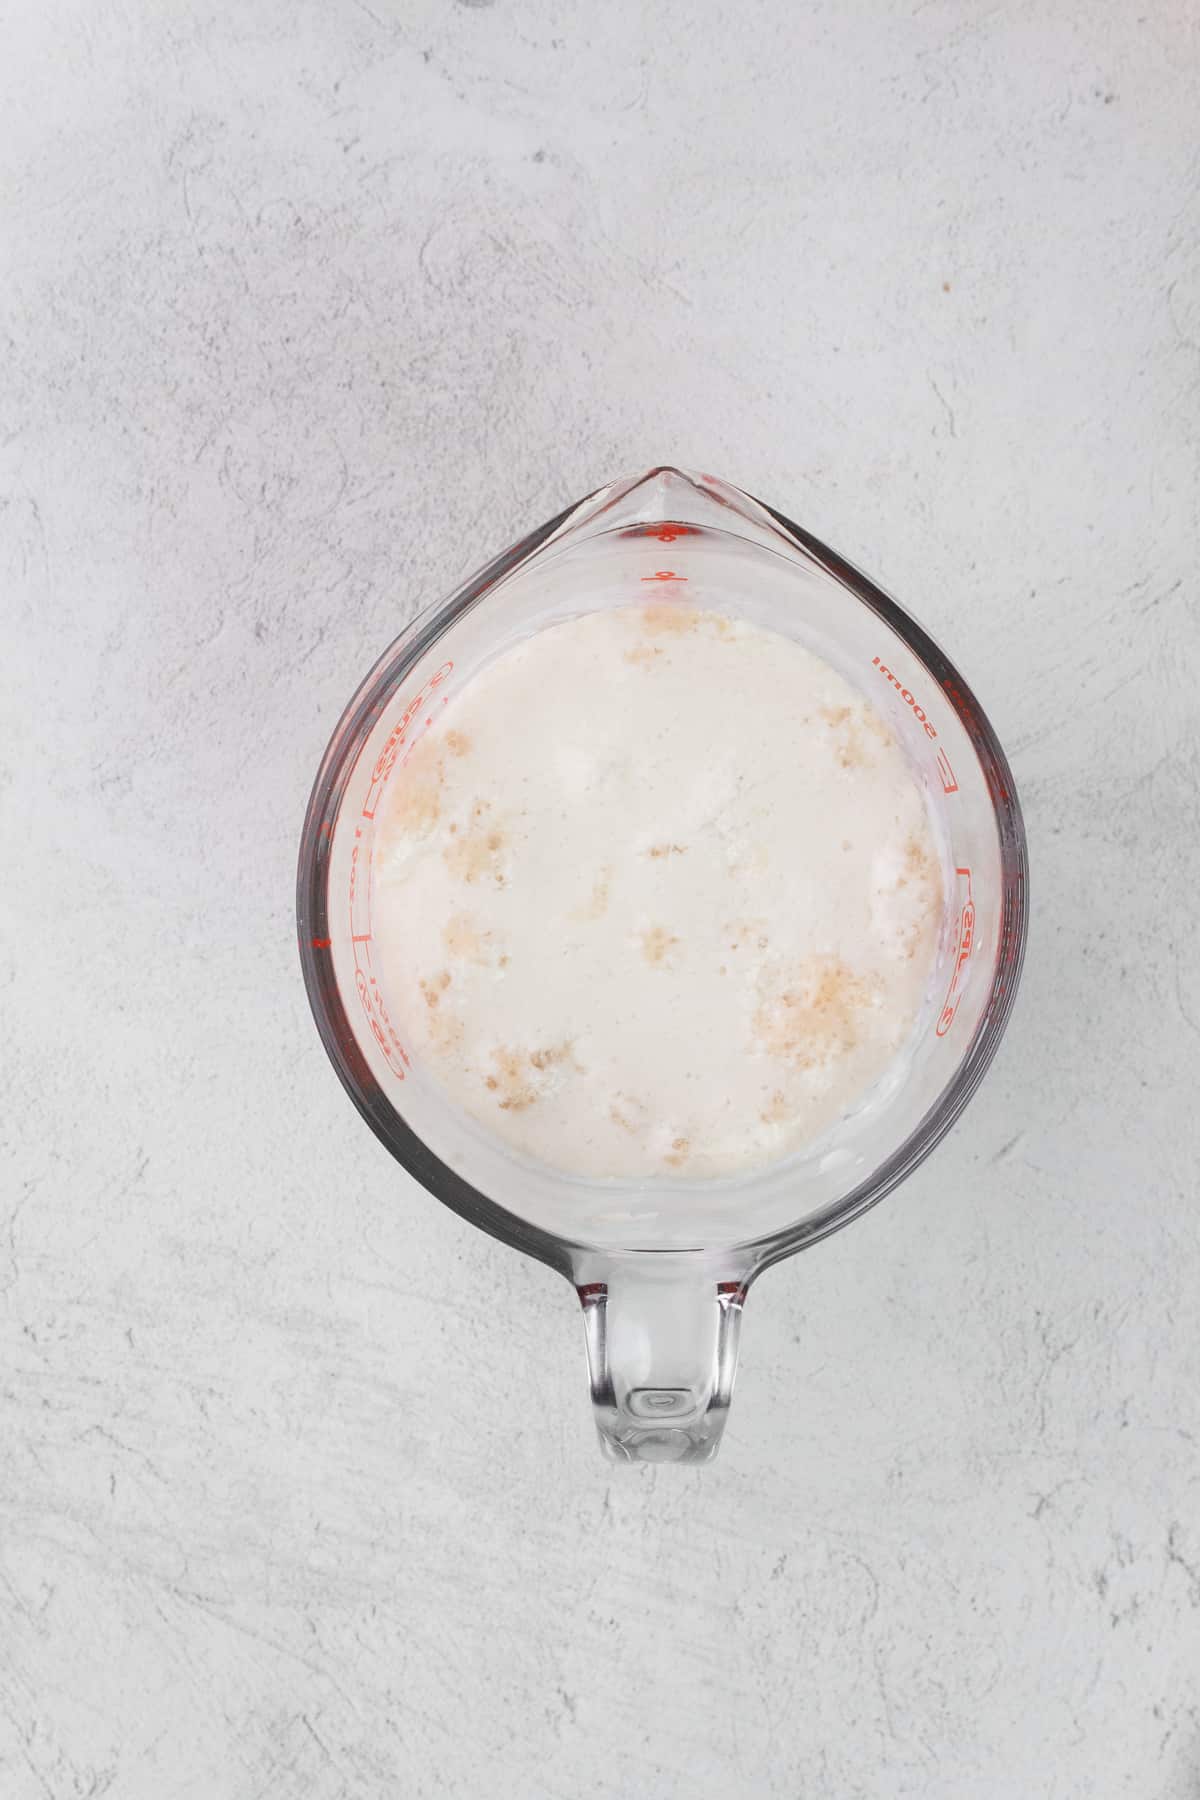
Step 1. Bloom the Yeast - Combine together active dry yeast, warm buttermilk and 1 teaspoon of sugar in a measuring cup or bowl. Allow to bloom for 8 to 10 minutes. The yeast mixture should be frothy.
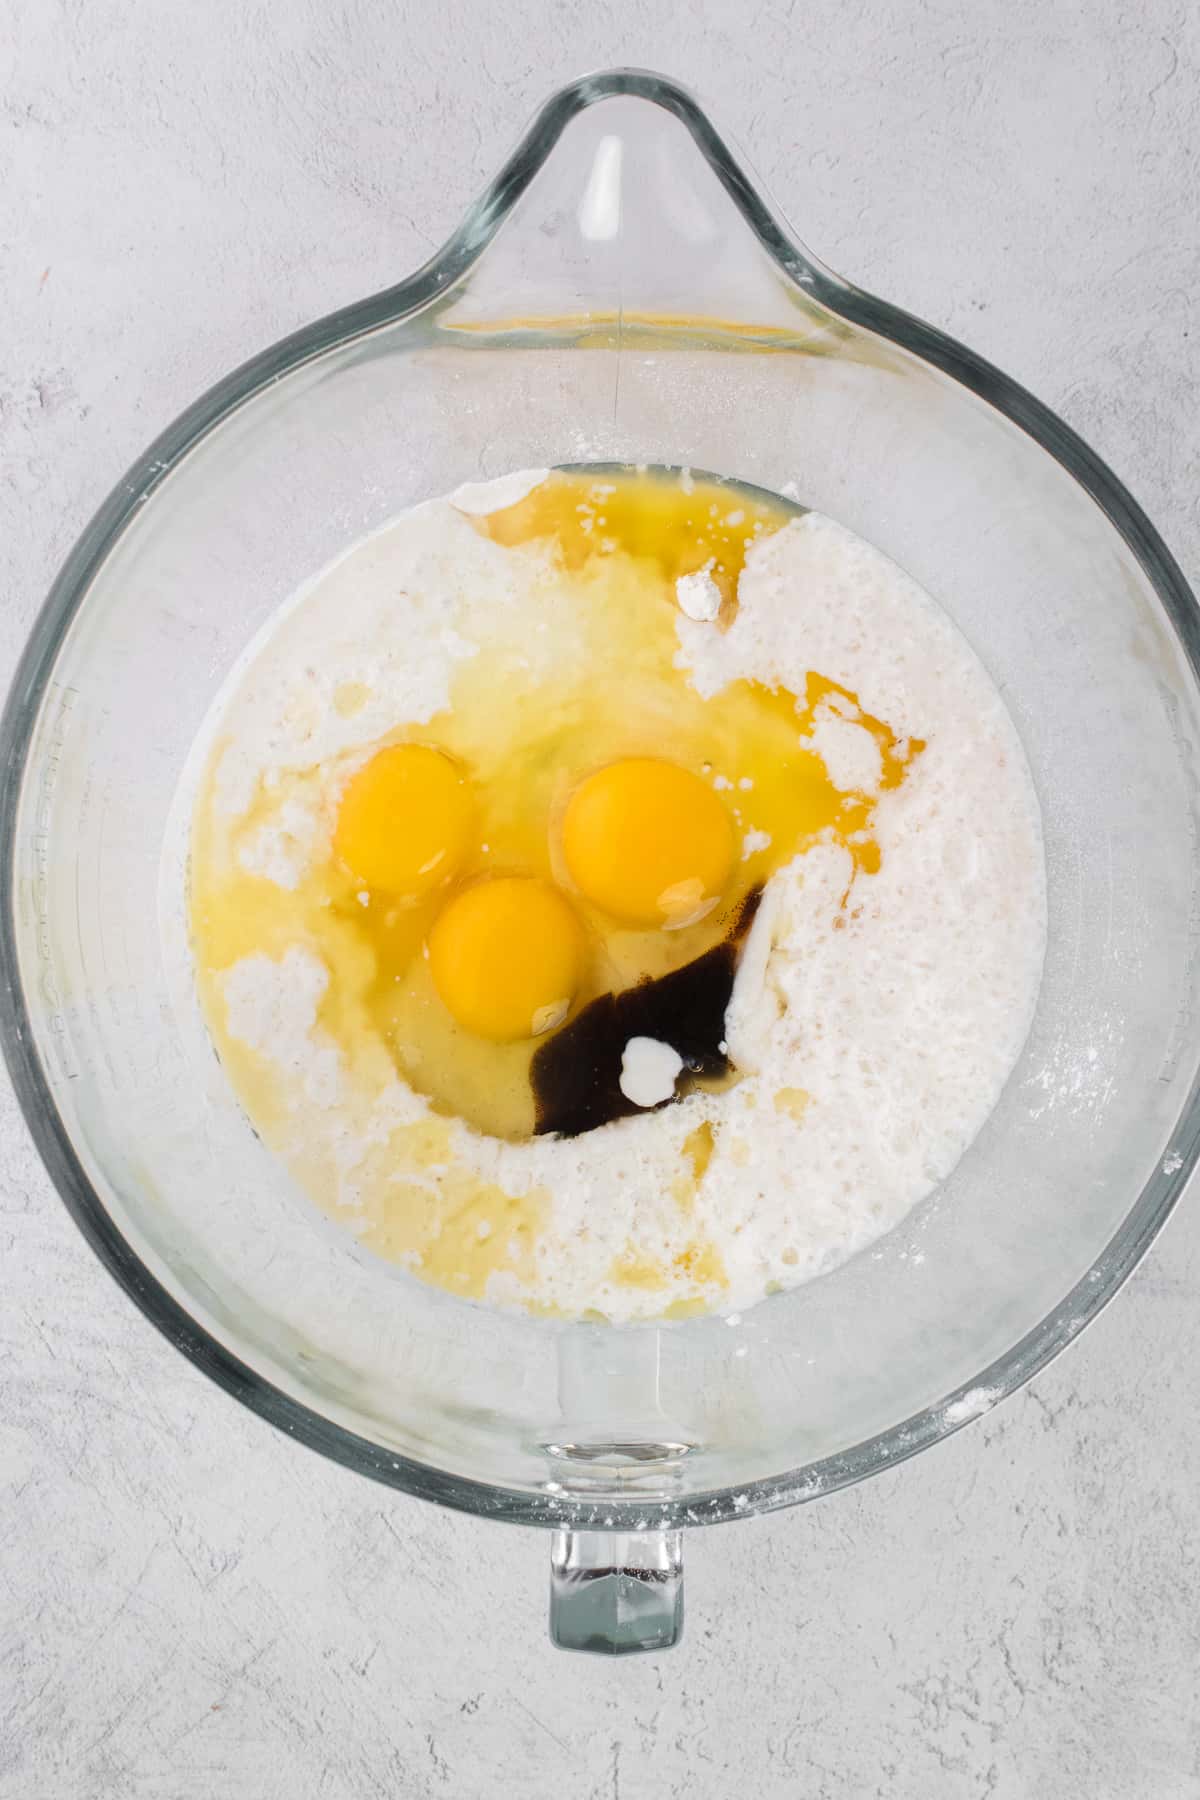
Step 2. Combine all Ingredients - In a large mixing bowl or stand mixer bowl, add all-purpose flour, bread flour, frothy yeast, remaining sugar, eggs, yolk, melted butter, vanilla, malted milk powder (if using) and salt.

Step 3. Knead the Dough - With a spatula, mix until the dough roughly comes together (will be shaggy). Fit your stand mixer with a hook attachment and knead the dough on medium/high speed for 10 to 15 minutes.
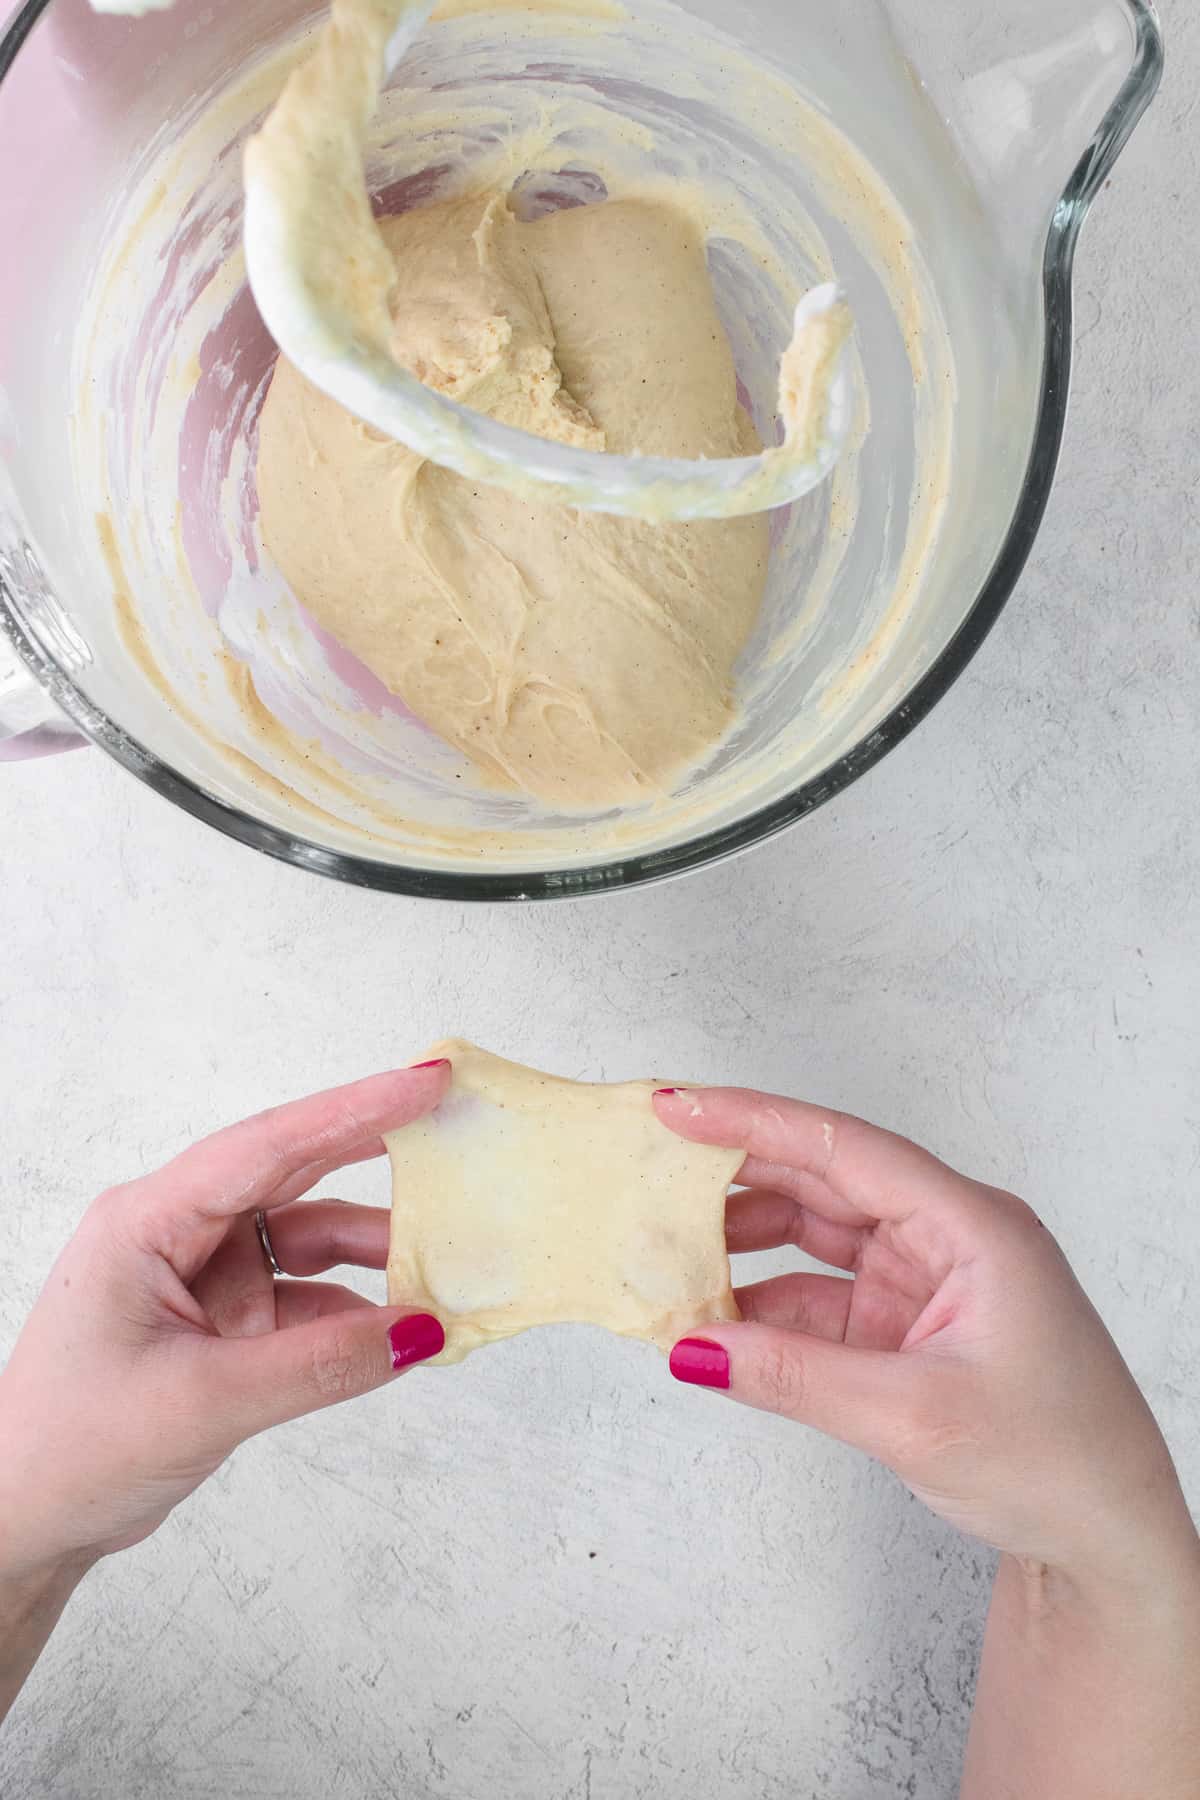
Step 4. Window Pane Test - The dough is properly kneaded when it passes the window pane test.
Cover with plastic wrap and allow to rise in a warm place for an hour or until it doubles in size.
Window Pane Test
Your dough is done kneading when it passes the Window Pane Test. To perform the test, take a small (2 tbsp) ball of dough and stretch it thin enough to let light pass through without tearing. If it tears, knead for an additional 1 to 2 minutes.

Step 5. Divide the Dough. Portion into 14 equal pieces. Using a kitchen scale, measure each ball of dough to make sure they are as even as possible. Mine were about 65 to 70 grams per ball.

Step 6. Shape the Donuts - Grab a piece of dough and press it flat to get rid of any air bubbles. Then gather and pinch the edges together and place it on your work surface. Next, Form your hand into a relaxed "claw" shape and cup it over the ball of dough. Then move your hand in small circular motions, gently dragging the ball along. It will tighten and the top will become smooth. Please watch the video below to see the technique.

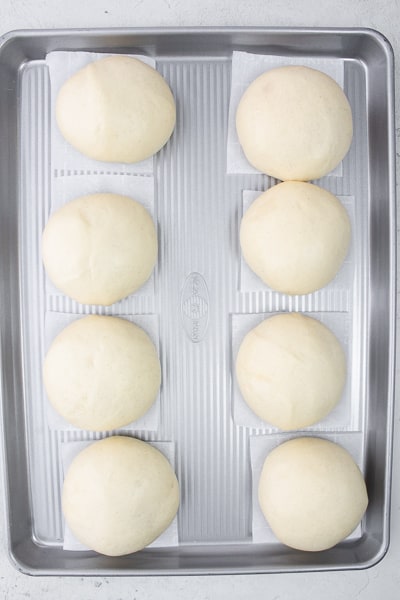
Step 7. Proof the Donuts - Place each ball of dough onto a 4×4 inch (10×10 cm) piece of parchment paper. I placed 6 to 8 donuts on each baking tray to give them more than enough room to proof. Loosely cover with plastic wrap that has been sprayed with a bit of oil and allow to rise for about 45 minutes or until it passes the "poke" test.
💡TIP! Proofing - The warmer the kitchen, the quicker the donuts will fully proof. When I use dry active yeast, it generally takes about 40 to 45 minutes. In order to know when the donuts are done, you should perform a "poke" test. Gently press your pointer finger on to the dough and if it springs back slowly and leaves a slight indentation, then it's ready to be fried. If the dough bounces back immediately, then it needs more time.

Step 8. Fry the Donuts - Once the oil reaches 350ºF (176ºF), fry 2 donuts at a time for 1 minute and 30 seconds on each side.
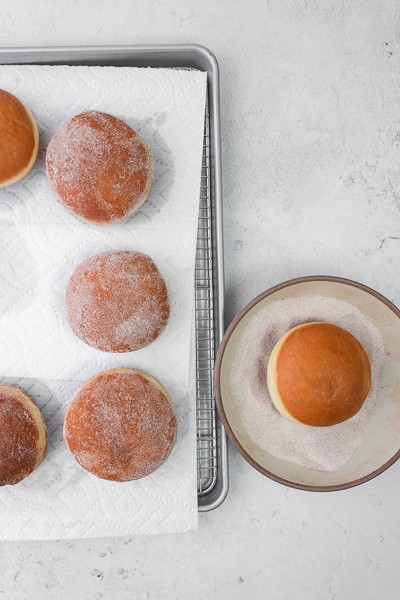
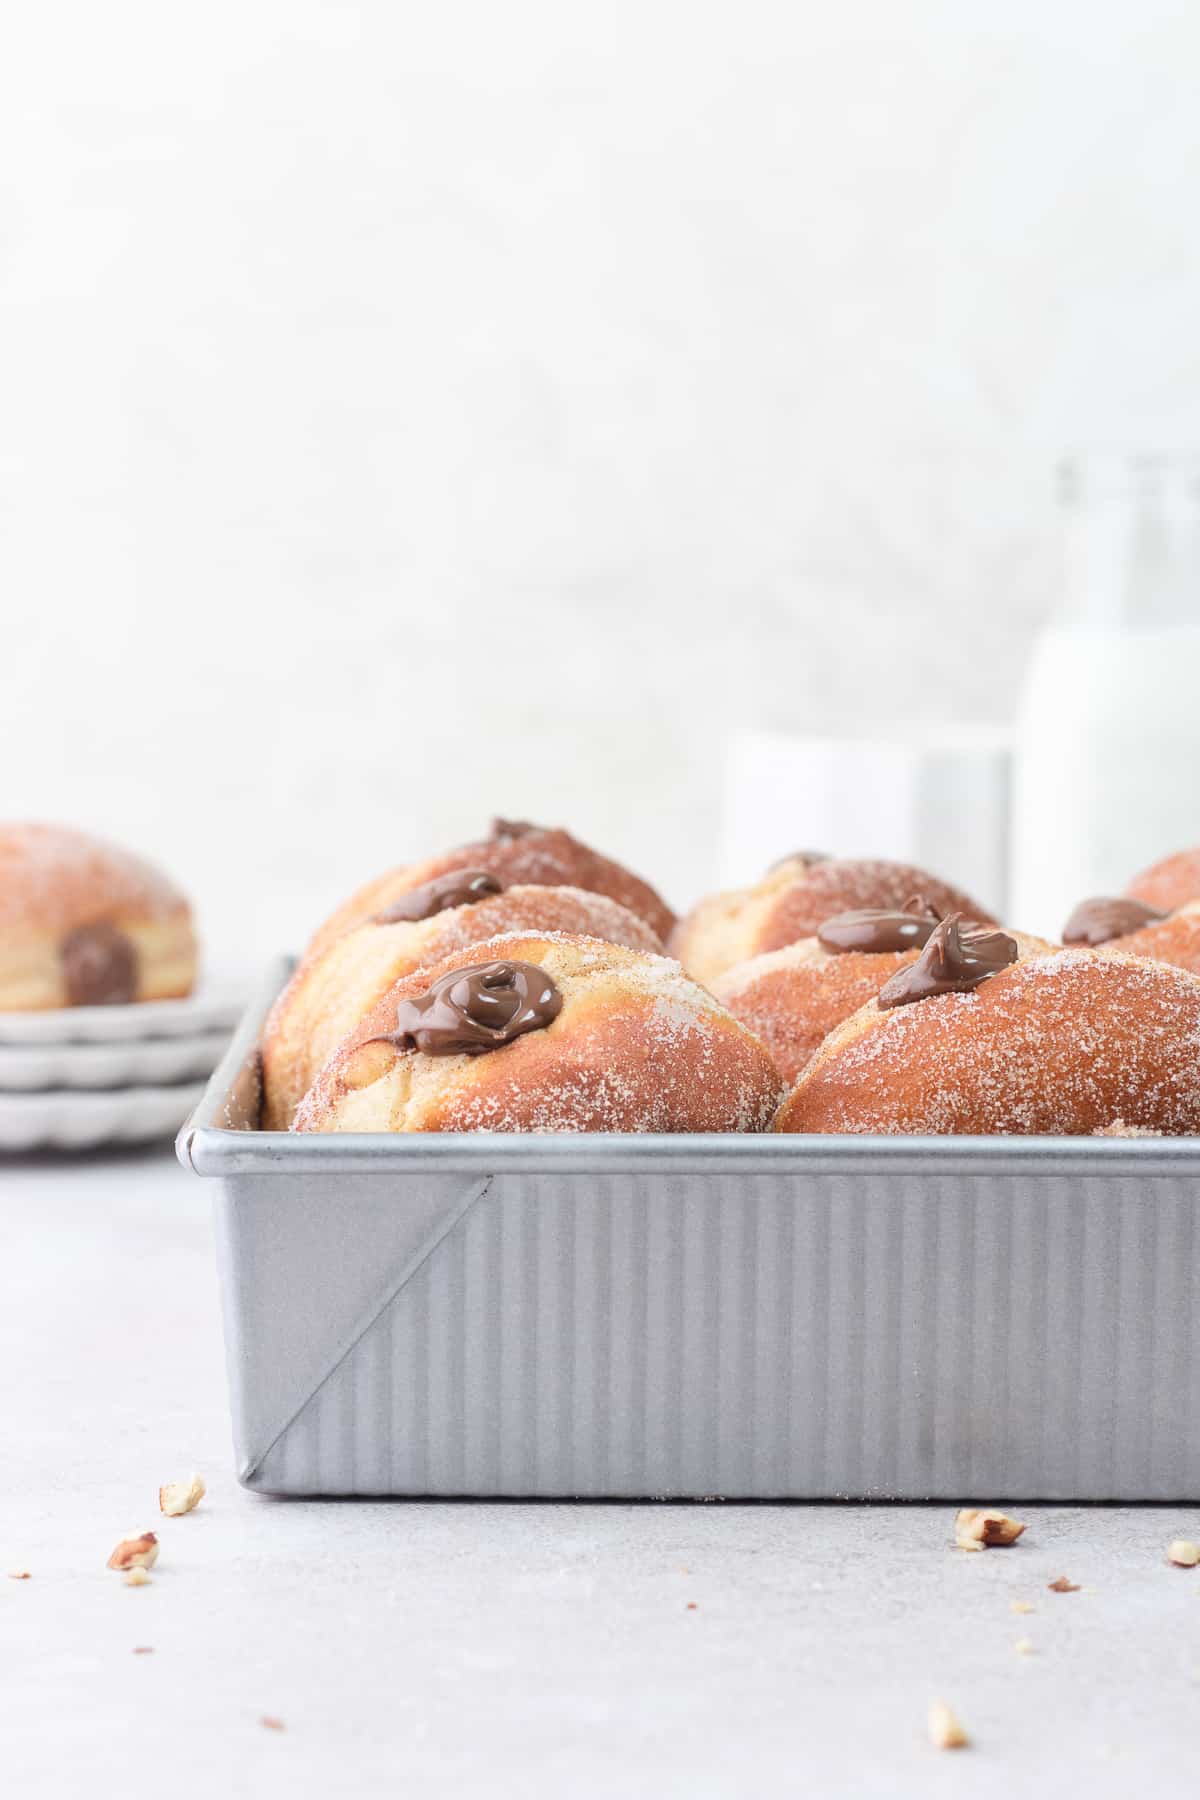
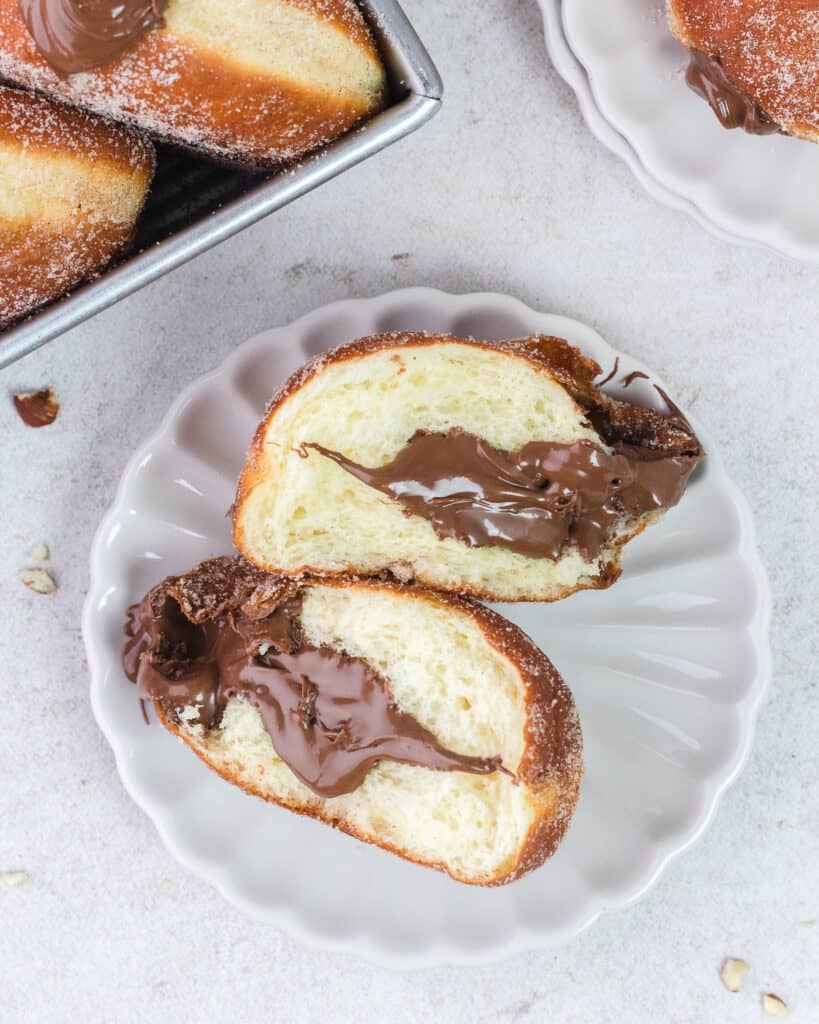
Step 9. Coat & Fill - Transfer fried donuts onto a paper towel-lined cooling rack and allow to cool for a few minutes before rolling into your cinnamon sugar. Using a chopstick or small paring knife, create a small hole/pocket on the side of each donut and fill with as much Nutella as you'd like. Devour right away and enjoy!!
💡TIP! When frying donuts, it's important to monitor the oil by using a thermometer. You'll want it to be between 350ºF to 360ºF (176ºC to 182ºC). If the oil gets too hot, just turn the burner to low or off to bring the temperature down. Alternatively, if it dips too low, turn the burner up and then proceed with frying once it's to temp.
Substitutions
- Bread Flour - If you don't have bread flour in your pantry, you can just use all-purpose flour. Keep in mind that you may need to add a bit more AP flour because bread flour (high protein) absorbs more liquid.
- Yeast - I almost always only use Active Dry Yeast, but you can also use instant yeast. If using instant yeast, there is no need to activate it in buttermilk. Just combine all of the dough ingredients together into the mixing bowl and proceed as written. You'll still want to warm your buttermilk though.
- Buttermilk - If you do not have any on hand, you can substitute by mixing ¼ cup of whole milk with ½ teaspoon of vinegar or lemon juice. Allow to curdle for 10 minutes before using. You can also just use plain whole milk if you're in a pinch.
- Malted Milk Powder - You can omit it completely.
Key Equipment
- Electric Mixer - While having a stand mixer is extremely helpful, you can also knead by hand. Please see directions in the FAQ section below.
- Thermometer - Having a thermometer that can clip to the side of the pot is crucial in order to monitor the temperature of the oil as you fry.
- Kitchen Scale - It's helpful to have when measuring ingredients accurately.
Storage
- Room Temperature - Nutella Filled Donuts can be stored in an airtight container for up to 2 days on the counter.
- Refrigerator - Filled Donuts can be stored in an airtight container for 2 to 3 days in the fridge. Allow to come to room temperature before serving.

💡Expert Tips
- Use a kitchen scale to weigh all your ingredients. Baking in grams rather than in volume, is the best and most accurate way to bake! All my recipes include gram conversions based on King Arthur's Weight Chart.
- If you are not using a kitchen scale, measure your flour correctly. Fluff and aerate your flour first, then spoon into your measuring cup and finally level off with the back of a butter knife. Do not pack it in as it will add too much flour.
- Make sure your yeast is fresh. If you are unsure, check by blooming a tiny bit of active dry yeast or instant yeast in warm liquid with a bit of sugar. Nothing is worse than continuing on with a recipe, and then discover later that your yeast is dead.
- Kneading your dough until it passes the window pane test. To perform the test, take a small (2 tbsp) ball of dough and stretch it thin enough to let light pass through without tearing it. If it tears, knead for an additional 1 to 2 minutes.
- Perform a "poke" test to know your donuts are properly proofed! Gently press your pointer finger into the dough and if it springs back slowly and leaves a slight indentation, it's ready to be fried. If the dough bounces back immediately, then it needs more time.
- Use a thermometer to consistently check the oil's temperature. It can rise and lower as you move through the frying process. Keep a close eye on the temperature to ensure it stay between 350ºF to 360ºF (176ºC to 182ºC). If the temperature of your oil is too low, your donuts run the risk of absorbing too much oil and if the oil is too hot, the donuts will brown too quickly and the center can be uncooked.
- Be prepared before you start frying your donuts. After the donuts are done proofing, this recipe moves quickly. Have your oil heated to temperature with a thermometer clipped to your pot, a cooling rack lined with paper towels and your filling and coating ready.
FAQ
Yes, there is no need to activate or bloom the instant yeast in warm buttermilk. Just combine all of the dough ingredients into your mixing bowl and proceed with the recipe. Make sure your buttermilk is warm though. Your rise and proof time will be a little shorter.
Yes, you can! You can knead by hand for up to 20 minutes or until it passes the window pane test. While kneading, it can get quite sticky, but refrain from adding too much flour. You can lightly oil your hands and use a plastic bench scraper to help move the dough around. Keep at it and eventually the dough will become smooth and less sticky.
Perform a "poke" test to know when your donuts are properly proofed! Gently press your pointer finger into the dough and if it springs back slowly and leaves a slight indentation, then it's ready to be fried. If the dough bounces back immediately, then it needs more time.
I like to use vegetable shortening, but you can use any oil with a high smoke point such as avocado oil (very expensive though), grapeseed oil, canola oil, vegetable oil or sunflower oil.
Recommended

♡ Did you try this recipe?
Please consider leaving a 5-star rating and review below. This provides helpful feedback to myself and other readers. Thank you so much!
📖 Recipe

Nutella Filled Donuts
INGREDIENTS
Donuts
- 1 Cup (227g) Buttermilk warmed to 105ºF
- 2 ¼ Tsp (7g) Active Dry Yeast
- ¼ Cup + 1 teaspoon (50g + 4g ) Granulated White Sugar, divided
- 4 Tbsp (57g) Unsalted Butter melted
- 2 Large Whole Eggs + 1 Yolk room temp
- 1 teaspoon Vanilla Extract
- 2 Cups (240g) Bread Flour
- 2 Cups (240g) All-Purpose Flour
- 2 tablespoon Malted Milk Powder optional
- ½ teaspoon Salt
- 2 Quarts 1.89 liters Frying Oil (canola, vegetable or shortening)
Cinnamon Sugar
- 1 Cup (200g) Granulated White Sugar
- 1 tablespoon Cinnamon
Filling
- Nutella
Instructions
- Bloom the Yeast - Combine together active dry yeast, warm buttermilk and 1 teaspoon of sugar in a measuring cup or bowl. Allow to bloom for 8 to 10 minutes. The yeast mixture should be frothy.
- Combine all Ingredients - In a large mixing bowl or stand mixer bowl, add all-purpose flour, bread flour, frothy yeast, remaining sugar, eggs, yolk, melted butter, vanilla, malted milk powder (if using) and salt.
- Knead the Dough - Fit your stand mixer with the dough hook attachment and knead on medium/high speed for about 15 minutes or until it passes the window pane test. If it's a bit sticky, you can gradually add 1 to 2 tablespoons of bread flour. see notes below for kneading by hand and window pane test
- Let Double in Size - Form dough into a ball, then place into a lightly oiled bowl (I used the same stand mixer bowl). Cover with plastic wrap and allow to rise in a warm place for about an hour or until it doubles in size.
- Divide the Dough - Gently punch your dough down to deflate it and then transfer to a lightly floured surface. Portion into 14 equal pieces. Using a kitchen scale, measure each ball of dough to make sure they are as even as possible. Mine were about 65 to 70 grams per ball.
- Shape the Donuts - Grab a piece of dough and press it flat to get rid of any air bubbles. Gather and pinch the edges together and then place it on your work surface seam side down. Form your hand into a relaxed "claw" shape and cup it over the ball of dough. Then move your hand in small circular motions, gently dragging the ball along. It will tighten and the top will become smooth. Place each ball of dough onto a 4×4 inch (10×10 cm) piece of parchment paper. I placed 6 to 8 donuts on each baking tray to give them more than enough room to proof.
- Proof the Donuts - Loosely cover with plastic wrap that has been sprayed with a bit of oil and allow to rise for about 45 minutes or until it passes the "poke" test. see not below
- Prep the Oil, Coating & Filling - With 20 minutes left of proofing, get your oil ready so that you can start frying right away. Fill a medium to large sized pot with at least 2 inches of vegetable shortening or neutral oil such as canola, vegetable, or avocado oil. During this time, you will also want to fill your Nutella in a piping bag or plastic zip bag, combine cinnamon sugar in a shallow bowl or dish and line 2 wire racks with paper towels.
- Fry the Donuts - Once the oil reaches 350ºF to 360ºF (176ºC to 182ºC), pick up 2 to 3 donuts by the parchment paper and gently place it into the hot oil. After a few seconds, remove the parchment paper with tongs. Fry for 1 minute on each side and then flip and fry for an additional 45 seconds on each side. (set a timer).
- Coat & Fill - Transfer cooked donuts onto a paper towel-lined cooling rack and allow to cool for a few minutes before rolling into your cinnamon sugar. Using a chopstick or small paring knife, create a small hole/pocket on the side of each donut and fill with as much Nutella as you'd like. Devour right away and enjoy!!

Leave a Rating and Comment