
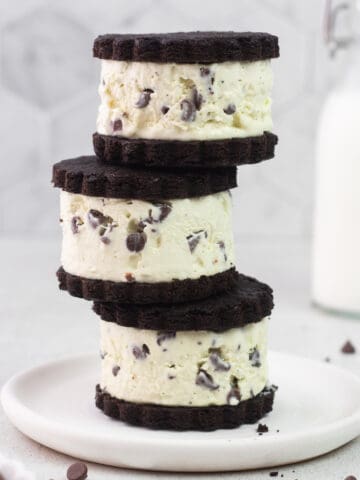
Roasted Cherry Ice Cream Sandwiches are the perfect summer treat to help you beat the heat! Homemade roasted cherry chocolate chunk ice cream, sandwiched in between the fudgiest brownie crinkle cookies. I think it’s safe to say, that these two are a match made in ice cream heaven!

Instructions
We will be making these irresistible ice cream sandwiches completely from scratch, starting with the homemade roasted cherry chocolate chunk ice cream and then the fudgy crinkle top brownie cookies.

Roasted Cherry Chocolate Chunk Ice Cream
I was inspired by Ben & Jerry’s Cherry Garcia ice cream when I created this recipe. The biggest question was figuring out what kind of cherries to use. I knew that throwing in fresh cherries would not produce the best result because of the water content. Any excess water crystals would make your ice cream icy. So I thought to myself, what would happen if I roasted the cherries in the oven? Boy, was it the best idea!


The texture of the roasted cherries in this ice cream is amazing! The cherries become soft and chewy. Roasting them at a high temperature with a little bit of sugar draws out the moisture, which allows the juices to caramelize into a wonderful syrup.
INGREDIENTS
- Heavy Whipping Cream – Essential for any ice cream. I use a higher ratio of whipping cream to whole milk because of the high fat content. The fat coats the ice crystals and prevents them from enlarging, thus creating a smoother and creamier texture.
- Milk – Use whole milk.
- Sugar – Sugar not only makes ice cream taste great, it also gives ice cream body. There’s a whole science behind the importance of sugar, but we will save that for another time.
- Egg Yolks – Egg yolks will make the ice cream thick and creamy.
- Vanilla Extract – Use real vanilla extract for the best flavor.
- Almond Extract – Almond extract is a must! This is the key to giving the ice cream that wonderful cherry flavor.
- Chocolate Chunks – I love using chocolate chunks, but feel free to use chocolate chips.
- Cherries – I used sweet red cherries for this recipe, but feel free to use any variety that is available in your area. We will be roasting them in the oven to cook out all the moisture, which will prevent the ice cream from having an icy texture.


If you do not have an ice cream machine, feel free to buy store-bought ice cream, but definitely make these delicious brownie crinkle cookies! The recipe has been adapted and slightly modified from Edd Kimber of, The Boy Who Bakes. They are perfectly chocolatey, fudgy and chewy. Making it the perfect vessel for these ice cream sandwiches!
Brownie Crinkle Cookies

HOW DO YOU MAKE BROWNIE CRINKLE COOKIES?
1. Melt butter and chocolate and set aside to cool. You can either use the microwave or over a double boiler.
2. In the bowl of a stand mixer fitted with a whisk attachment, whisk brown sugar, white sugar, eggs and vanilla extract for 5 minutes on medium high speed. Scrape down the sides and the bottom of the bowl half way through.


3. After 5 minutes, the mixture will be pale in color and thick.
4. Add melted chocolate and mix until completely incorporated. About 2 minutes. Remember to scrape the sides and bottom of the bowl.


4. Sift in flour, cocoa powder, baking powder and salt. Mix until just combined. Do not overmix.


6. With your 1 ½ tablespoon (30 grams/0.8 oz) cookie scoop, immediately scoop batter onto a parchment lined baking tray 2 inches (5 cm) apart. You should end up with 24 cookies. Bake at 350ºF (176ºC) for about 10 minutes.
7. Keep cookies on the baking tray for at least 3 minutes before transferring to a wire rack and allow to cool completely.


Assemble the ice cream sandwiches and eat right away!

Look at those beauties, how could you resist? Enjoy!

Measuring By Weight
Measuring ingredients by weight, rather than by volume, is the most accurate way to bake. Unfortunately, not all measuring cups are created the same, so your one cup will be different from my one cup. Additionally, there are measuring cups that are specifically designed for liquid and for dry ingredients. I highly recommend purchasing an inexpensive kitchen scale and weighing your ingredients to prevent any inaccuracies. For your convenience, my recipes are written in grams, with the exception of teaspoons/tablespoons, to ensure your bakes come out perfect every time!
If you would like to learn more about measuring by weight, you can refer to King Arthur’s ingredient weight chart.

MORE RECIPES TO LOVE

Recipe

ROASTED CHERRY ICE CREAM SANDWICHES
- Yield: 12 Ice Cream Sandwiches 1x
Description
These Roasted Cherry Ice Cream Sandwiches are are irresistible! Homemade roasted cherry chocolate chunk ice cream, sandwiched in between chewy brownie crinkle cookies.
Ingredients
Roasted Cherries
- 14 oz (396 grams) Fresh Cherries
- 2 Tbsp (24 grams) Granulated White Sugar
- ½ Tsp Almond Extract
Roasted Cherry Ice Cream
- 2 Cups (1 pint or 473 grams) Heavy Whipping Cream
- 1 ¼ Cup (300 grams) Whole Milk
- ½ Cup + ¼ Cup (100 grams + 50 grams) Granulated White Sugar, divided
- 5 Large Egg Yolks
- 2 Tsp Vanilla Extract
- 1 ½ Tsp (or to taste) Almond Extract
Ice Cream Mix-In
- Roasted Cherries
- ¾ Cup (120 grams) Dark Chocolate Chunks
Crinkle Top Brookies
- 1 Cup (120 gram) All-Purpose Flour
- ¼ Cup (25 grams) Dutch Process Cocoa Powder
- 1 Tsp (4 grams) Baking Powder
- 1 Tsp (3 grams) Sea Salt
- 9 Tbsp (127 grams) Unsalted Butter
- 7 oz (200 grams) Dark Chocolate (60 to 70%), chopped
- ½ Cup + 1 tablespoon (112 grams) Brown Sugar, Packed
- ½ Cup (100 grams) White Sugar
- 2 Large Egg, room temp
- 1 Tsp Vanilla Extract
Instructions
Roasted Cherries
- Preheat oven to 425ºF (ºC)
- Clean and destem cherries (no need to pit them). Place cherries and sugar on a parchment lined baking tray and roast for 35 minutes. Stir every 10 minutes.
- Place into the fridge to cool for 20 minutes. Once cooled enough to handle, remove pits and roughly chop the cherries. Transfer the cherries and their juices into an airtight container and mix in ½ teaspoon of the almond extract. Store in the fridge until needed.
Roasted Cherry Ice Cream
- In a large saucepan over medium heat, whisk together heavy cream, milk and ½ cup of sugar. Allow the mixture to simmer 170ºF (76 ºC). Be careful not to boil.
- Meanwhile, seperate your eggs. Place egg yolks and ¼ cup (50 grams) of sugar in a medium sized bowl and whisk until it thickens and becomes a pale yellow. You can do this by hand or with a hand held mixer.
- Once the cream/milk mixture reaches 170ºF (76ºC), turn the heat off. Now we need to temper the yolks. In a slow and steady stream, add ¼ cup (56 grams) of the warm cream/milk mixture into the yolks while whisking continuously. This is important so you don’t scramble the yolks. Add another ¼ cup (56 grams) and whisk, repeat 2 more time. Slowly pour the egg mixture back into the pot and whisk well and constantly. Over medium heat, bring the mixture back up 175ºF (79ºC) to 180ºF (82º C).
- Turn heat off and stir in vanilla extract and almond extract.
- Strain mixture into a clean medium sized bowl. We are straining to ensure a smooth custard.
- Place the plastic wrap directly onto the mixture to prevent a skin from forming. Place another piece of plastic wrap to cover the bowl completely.
- Chill overnight for at least 8 hours. The colder the better.
- Pour the custard into an ice cream machine and follow the manufacturer’s directions.
- Depending on your ice cream machine, it will thicken and resemble soft serve after about 10 minutes. Add roasted cherries and chocolate chunks and churn for a few more minutes.
- Transfer ice cream to an airtight container and store in the freezer for 8 hours.
Crinkle Top Brookies
- Preheat oven to 350ºF (176ºC)
- Melt butter and chocolate in the microwave or small saucepan and set aside.
- Sift dry ingredients (flour, cocoa powder, baking powder and salt) to a medium sized bowl and set aside.
- In the bowl of your stand mixer fitted with a whisk attachment, beat eggs, brown sugar, white sugar and vanilla extract for 5 minutes. Remembering to scrape down the sides and bottom of the bowl half way through. Alternatively, you can use a hand held mixer.
- Add dry ingredients and mix until just combined. Be careful not to overmix.
- With a small cookie scoop, quickly scoop your cookies on a parchment lined baking tray 2 inches (5 cm) apart. You should end up with 24 cookies.
- Bake at 350ºF (176ºC) for about 10 minutes. Keep cookies on the tray for at least 3 minutes before transferring to a wire rack to completely cool.
Assembly
- When you are ready to assemble your sandwiches, remove your ice cream from the freezer. Turn a cookie upside down and place 1 large scoop of ice cream on top and then top with a second cookie. Enjoy!
Notes
- You can make as many as 12 cookie sandwiches. You can preassemble each ice cream sandwich and store in an airtight container in the freezer, but I prefer to assemble right before consuming. I prefer the texture of the cookies when they are at room temperature. But either way, they will be delicious!
- Store any unused cookies in an airtight container at room temperature for up to 3 days.
If you have made this recipe, I would love to know how it turned out for you! Please consider leaving a star rating and review below and tag me on Instagram @shortstackkitchen. Thank you so much!


Leave a Rating and Comment